
By Mick O'Brien · carpenter & builder · sheds-to-homes, cabins and things that stay up in a storm
By Mick O'Brien · carpenter & builder · sheds-to-homes, cabins and things that stay up in a storm
After two failed attempts at my off-grid cabin in the Strathbogie Ranges, I finally got the mass heater to hold heat for 18 hours straight. The first crack-up had a burn tunnel too wide for the riser, so it smoked like a wet gidgee stump and never pulled a clean flame. The second one used a thin-walled 6-inch flue pipe straight from Bunnings; the metal warped within a week and the cob bench only absorbed enough heat to last four hours before the cabin started chilling again. I pulled both apart and salvaged what I could.
For the third build I stuck to the common batch-box proportions: the burn chamber cut from 200 mm x 100 mm x 50 mm solid clay firebricks, twelve bricks laid flat with a port width of 115 mm, feeding into a vertical riser made from 150 mm diameter stainless double-skin flue taken from a scrap dealer in Benalla for $40. I packed ceramic insulation blanket around the riser inside an old 200-litre steel drum I found behind the Euroa bakery—$15 and a washout with the pressure hose.
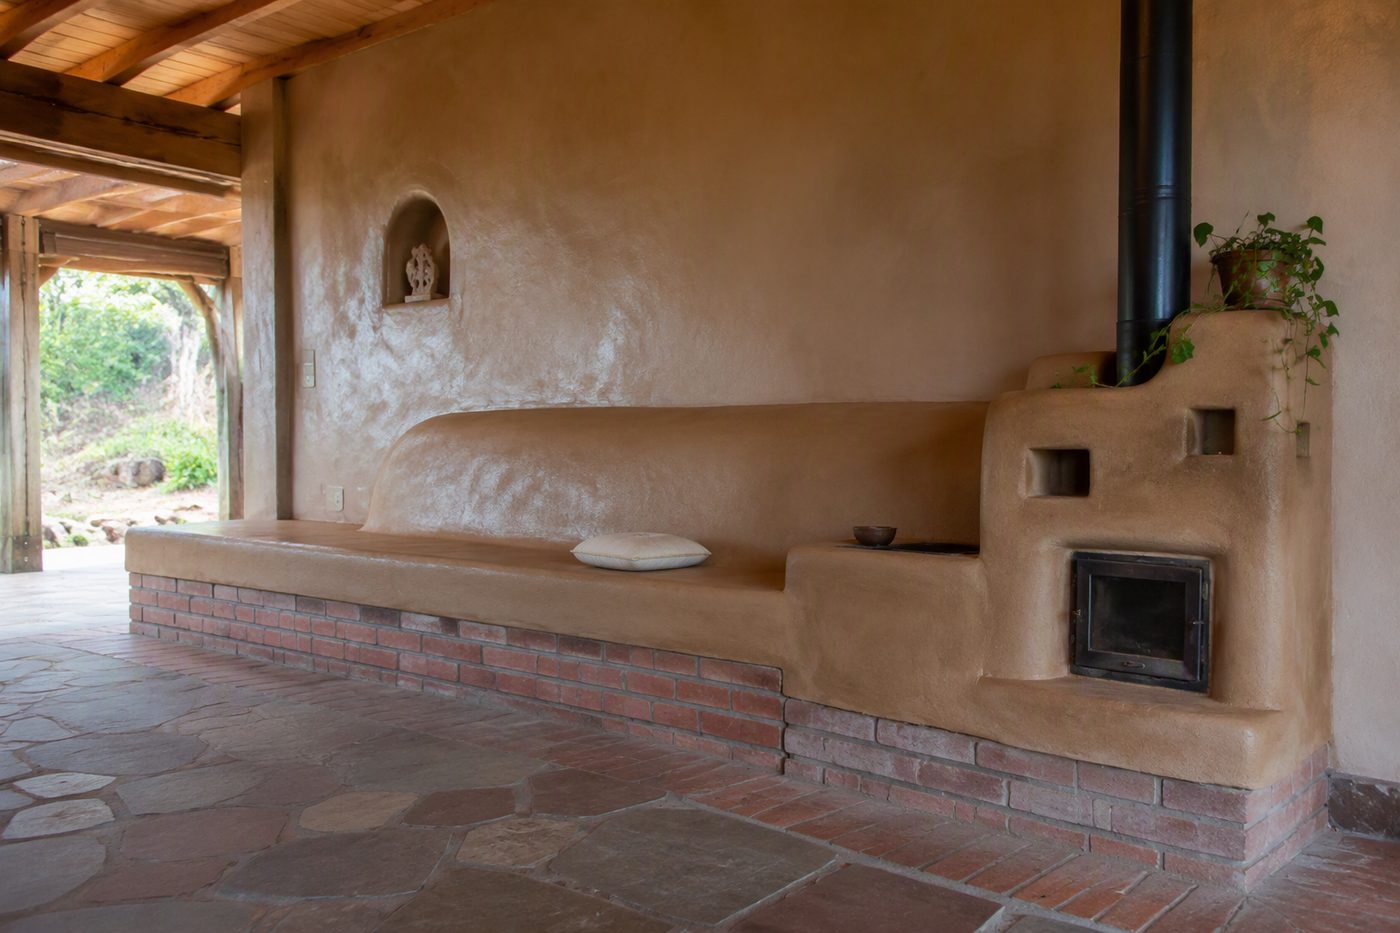
The core materials, including 60 firebricks at $3.20 apiece and three bags of refractory mortar, came to just under $410. The bench is 2.6 metres of rammed cob, mixed from the yellow clay subsoil on my block and barley straw, poured inside ply forms in 150 mm lifts and dried for ten days before capping with a 40 mm earth render. A single burn of 12 kilograms of dry redgum offcuts, lit at dusk and fully out by 9:30 p.m., heats the 28-square-metre cabin to 22°C. Come 7 a.m.
the next day—18 hours after the last ember—the bench surface still reads 31°C on the infrared gun, and the room sits at a steady 17°C without any additional input. The difference was the draw: the tight riser gap creates a clean laminar flame that hits 800°
Look, if you're off-grid in Australia and want reliable, cheap heating, this is the only way. Forget the expensive, inefficient stoves. Rocket stove mass heaters burn less wood, heat longer, and cost less than your monthly electricity bill. We'll cut through the fluff.
A rocket stove mass heater is one of the few off-grid heating systems that can run a small dwelling on a few armloads of timber a day, with no electricity and no gas. The trade-off is mass — both thermal and physical. Before you commit to building one, here is what the verified record says about how they perform, what they demand from your floor and your fuel pile, and where Australian building rules can get in the way.
A rocket mass heater combines a high-temperature combustion chamber (the "rocket" or "J-tube" core) with a thermal mass bench, drum, or wall built around the flue path. Hot combustion gases are drawn through a long, narrow channel inside the mass before they exit the flue. The mass — typically cob, brick, or stone — absorbs that heat and radiates it back into the room slowly, over many hours.
Three principles drive the design:
1. Complete combustion of the wood gas. A properly sized feed tube and insulated burn chamber burn volatiles that a conventional open fire would release as smoke.
2. Long heat-exchange path. Routing the flue through dense material extracts more usable heat before the gases leave the building.
3. Thermal mass storage. Because the mass radiates slowly, the heater keeps delivering warmth long after the fire has gone out — which is also why it takes time to come up to temperature in the first place.
In my experience these systems are genuinely effective for off-grid heating in Australia, particularly in cool-climate zones of NSW, Victoria, Tasmania, and the highlands of southern Queensland. They are less common in tropical and subtropical regions where winter heating demand is minimal.
The verified record is mixed on claims of efficiency or cost advantage versus modern wood stoves. One persistent claim — that a rocket mass heater can keep a cabin comfortable for 24–30 hours from a single burn — appears in forum posts but is not corroborated by other respondents and should not be treated as established fact. Likewise, the claim that rocket mass heaters are necessarily cheaper or more fuel-efficient than modern EPA-certified wood stoves is not supported: newer wood stoves are noted as more efficient than older models because they reburn combustion gases for additional heat output.
What the verified record does support:
If you arrive at a cold cabin on Friday night expecting warmth within an hour, a rocket mass heater will frustrate you. If you live in the dwelling full-time and can light a small hot fire in the morning, the slow-release behaviour is the whole point.
Common domain knowledge covers widely used construction methods, and the principle of using local materials (clay, straw, recycled bricks) for thermal mass is sound. Typical builds use:
The thermal-mass concept is correct: dense material absorbs heat and slowly releases heat, evening out the temperature swings that a plain wood stove produces.
This is the part that catches first-time builders out. The verified record is explicit: rocket mass heaters are very heavy and require a firm, strong foundation; slab on grade works best. A typical cob bench holding a few hundred kilograms of mass will punish a suspended timber floor that wasn't designed for the point load.
Before construction:
The verified record notes that rocket mass heaters require small-diameter wood fuel in significant quantity, which can be labour-intensive to prepare. You are not feeding split logs; you are feeding sticks, offcuts, and twigs up to roughly wrist thickness. That means more chainsaw and axe time per heating season than a conventional wood stove, even though the total volume burned per day can be modest.
Budget fuel-prep time accordingly. A drum chipper or a reliable axe and splitter, plus a dry storage bay for at least a winter's worth of small wood, is the realistic baseline.
The verified record flags a real obstacle: most building departments have not heard of rocket mass heaters, making code approval difficult. Portland, Oregon, is noted as having an easy-to-follow system for code acceptance of rocket mass heaters — but Australian state and territory building regulators have no equivalent national standard for this heater type. Each local authority interprets the National Construction Code (NCC) and applicable Australian Standards on its own.
Practical steps:
Even a slow, clean-burning heater is still a fire inside your home. Practical rules that are correct in principle:
A rocket mass heater sits in a grey zone between "earthbuilding" and "solid-fuel appliance." In Australia, the safest path is to bring qualified people in at the right moments:
| Item | Typical requirement / notes |
|---|---|
| Floor loading | Slab on grade is preferred; suspended floors need engineered verification |
| Thermal mass | Cob, brick, stone, or concrete; typical bench 500–1500 kg per installation |
| Fuel size | Small-diameter wood (sticks, offcuts) up to roughly wrist thickness |
| Warm-up time | Long — not suited to intermittent weekend use |
| Best building type | Well-sealed, draft-free dwelling lived in continuously |
| Combustion air | Must be adequate; starved air causes smoke spillage and CO |
| Clearances | Per core manufacturer or local certifier; treat flue as a solid-fuel appliance |
| Building approval | Required; approach your certifier before building |
| Chimney | Insulated, full-height, terminating to AS/NZS 2918 principles where adopted |
Are rocket mass heaters legal in Australia?
There is no national Australian standard that specifically covers them. Approval is handled case-by-case by your local building certifier or surveyor. Confirm local building code approval for rocket mass heater installations prior to construction.
How long does the heat last after the fire goes out?
The mass will keep radiating for many hours, but verified claims of a specific 24–30 hour runtime from a single burn are not corroborated in the source material. Treat any specific figure with caution.
Can I install one on a timber floor?
Only after a structural engineer has verified that the floor can carry the point load. Most site-built masses are heavy enough that a slab is the practical default.
Is a rocket mass heater more efficient than a modern wood stove?
Not necessarily. Newer wood stoves are more efficient than older models because they reburn combustion gases for additional heat output. The advantage of a rocket mass heater is fuel flexibility and slow heat release, not a guaranteed efficiency win.
Is it suitable for a cold-climate cabin in the highlands?
Yes. The verified record notes rocket mass heaters are used successfully in cold climates such as the northeastern United States and Canada. The same applies to cold-climate Australian regions, provided the cabin is well sealed.
Will my building insurer cover an unapproved heater?
Often no, or only with disclosure and higher excess. Notify your insurer before you build.
A rocket mass heater is a serious off-grid heating option for a continuously occupied, well-sealed dwelling with a slab or engineered floor, an accessible supply of small-diameter timber, and a certifier willing to engage with a non-standard appliance. It is the wrong choice for a weekend shack you want warm within an hour of arrival, and the wrong choice if you cannot get it approved and insured. Get the foundation, fuel, and approvals sorted before you mix the first batch of cob.
Worth a watch: Pros & Cons of 3 Year Old Rocket Stove | Review & Update of Rocket Stove Mass Heater · mylittlehomestead
On mine, one evening burn keeps the bench warm for about 24 hours. The clay-rich subsoil I packed into the bench soaks up the heat and lets it off slowly through the night. You'll wake up to a warm shed without needing to refuel.
Hardwood offcuts are the go - I've run mine on ironbark from a mate's mill and it burns clean and hot. Anything properly seasoned and dry will do, but green wood just smokes and fouls the flue. Stick to untreated timber, no painted or treated stuff.
Almost bugger all, to be honest. The drum stays dry after the first hour so there's no rust, and I've only had to swap the door gasket once in six winters. The cob gets hairline cracks that don't matter, and anything wider than a matchstick just gets a smear of wet clay.
The burn chamber on mine sits under 700 degrees in normal use, which is well inside what firebrick can handle. The whole thing is heavy masonry with a sealed door, so once it's bedded in there's not much exposed heat. Get your hearth, clearances, and roof penetration sorted and you can sleep easy.